There are many old homes in inner west Sydney that have ‘add on’ extensions that may have been built over 50 years ago when building standards were not what they are today. A recent project we worked on was an inner west home that had an old single brick extension to the original home that was now used as a kitchen. The east facing wall was showing signs of damp getting through the single brick wall.
The construction of the wall was single brick that had been rendered on the outside and plastered on the inside. On inspection of the outside of the wall it appeared that the render had never been painted – certainly if it had it was
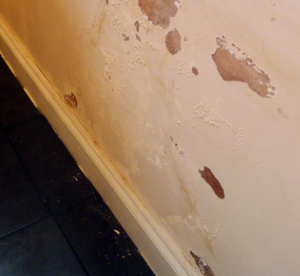
Damp Wall
difficult to see it. The inside of the wall displayed all the signs of damp going horizontally through the wall ( as opposed to rising damp). The paint work was bubbling as there were significant areas of mould growing on the wall. The options in this type of situation are varied. The owner did not want to spend a lot of money on the issue. The most appropriate action would probably to firstly fix the underlying issues of water penetrating through the wall and secondly ‘line’ the single brick structure by installing timber battens on the wall and gyprocking it to provide a second internal ‘skin’. This would also insulate the room and make it warmer in winter and cooler in summer. The owner did not want to go down this path and wanted only to address the immediate issue of water ingress.
We approached the problem as follows. Firstly we cleaned and scraped back the external rendered brick wall so the surface was clean and free from dirt. It was washed down thoroughly and left to dry. We then applied coats of Dunlop Damp-proof Waterproofing product which we purchased from Bunnings. This product works well over rendered brick, is easy to apply with a suitable roller and wide brush and can be painted over with virtually and paint or finish. It was applied in 3 coats over a few days with adequate drying time allowed for. Always take into account the temperature when considering recoating times. Our inner west cold snap recently means that it is sometimes wise to extend the published drying times.
Once the damp proof product had been applied we painted over it with a high quality external paint. We used a  Dulux acrylic paint which we have found to be very good in past external handyman jobs. On the inside of the wall we scraped back the damaged plaster and thoroughly cleaned the wall and used a mould killing preparation on the surface. We then patched the damaged plaster with a good quality plaster filling compound and smoothed and sanded the surface. Ideally it is best to leave the wall for a few weeks, the longer the better, to let any inherent damp dry out prior to repainting the wall. We painted the wall with a good quality sealer and then applied 2 coats of quality top coat paint.
Damp walls can be difficult, at times. to correctly diagnose the cause of the water ingress. The applies particularly on older homes where damp course problems, roof flashings that have deteriorated, build up of soil around walls and a myriad of other issues can make pinpointing the cause of the problem difficult at times. As a handyman we are really required to work on all sorts of jobs without necessarily specialising in any area. We rely on good advice from product manufacturers to use the correct product for any particular job. If in doubt we will refer the client to a ‘specialist’ who has superior experience in a specific area.